Insights
Automated Invoice Capture Software: 10 Tools Compared, Honestly Rated
10 automated invoice capture tools compared honestly. Includes real cost data, ROI calculator, format support matrix, and an 8-point evaluation checklist.
TallyScan Team
If you are manually entering invoice data into QuickBooks Online after it has already been captured somewhere else, you are paying twice for the same information. The first payment is the time spent processing the original invoice. The second is the time spent re-entering the same data, plus the cost of the inevitable errors that re-entry produces.
A proper integration with QuickBooks Online eliminates the second payment entirely. Invoice data flows directly from your AP system — from the moment it is captured — into your QuickBooks general ledger without manual intervention. Your books are current, accurate, and complete without anyone retyping a number.
This guide covers what a QuickBooks Online integration actually does at the data level, how to set it up correctly, field-by-field mapping guidance, how to troubleshoot the most common sync errors, and what to verify before trusting your connected system with real financial data.
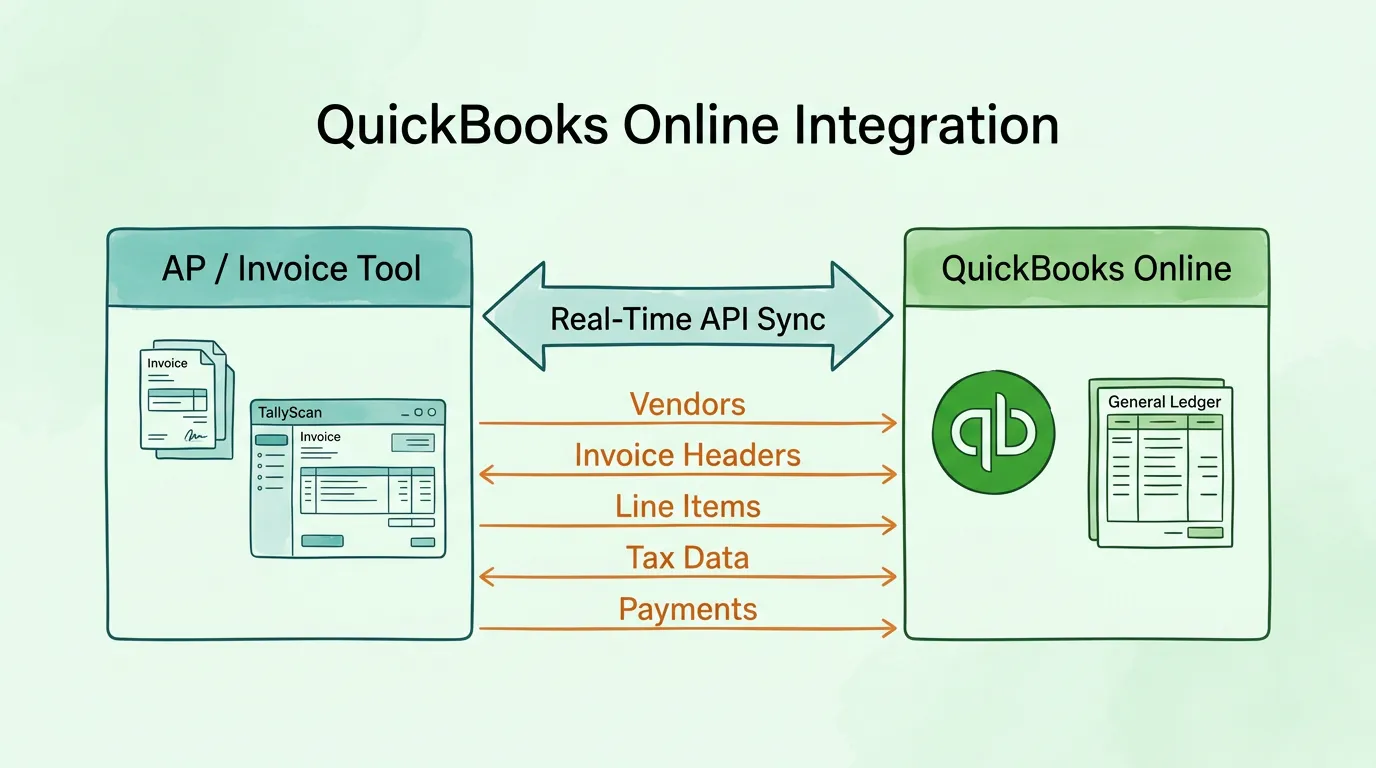
The phrase "connects to QuickBooks Online" is used to describe anything from a CSV import/export tool to a real-time API integration. The difference is significant.
What a real-time API integration delivers:
What a CSV integration actually means:
When evaluating any integration with QuickBooks Online, ask specifically: is this a direct API connection or a file-based import? The experience and the data quality are fundamentally different.
QuickBooks Online supports integrations with over 750 third-party applications through its QuickBooks App Store, making it one of the most connected accounting platforms available. The OAuth 2.0 authorization standard that all integrations use is documented on the Intuit Developer Portal, which is the same authorization mechanism used by Google, Apple, and Meta for third-party app access.
Understanding exactly what data moves between systems — and where it lands in QuickBooks — is the foundation of a reliable integration. Most sync failures trace back to a mismatch in one of these five categories.
When an invoice arrives from a vendor, the integration checks whether that vendor exists in your QuickBooks vendor list. If it does, the invoice is linked to the existing vendor record. If it does not, the behavior depends on your configuration: most integrations can either auto-create a new vendor in QuickBooks or route the invoice to a "new vendor" exception queue for manual review.
What syncs in a vendor record:
The critical data quality requirement: Vendor names must be consistent between your AP tool and QuickBooks. "Acme Corp", "ACME CORPORATION", and "Acme Corp." are three different vendors to a sync engine. A vendor name mismatch is the most common cause of duplicate vendor records and failed invoice matches.
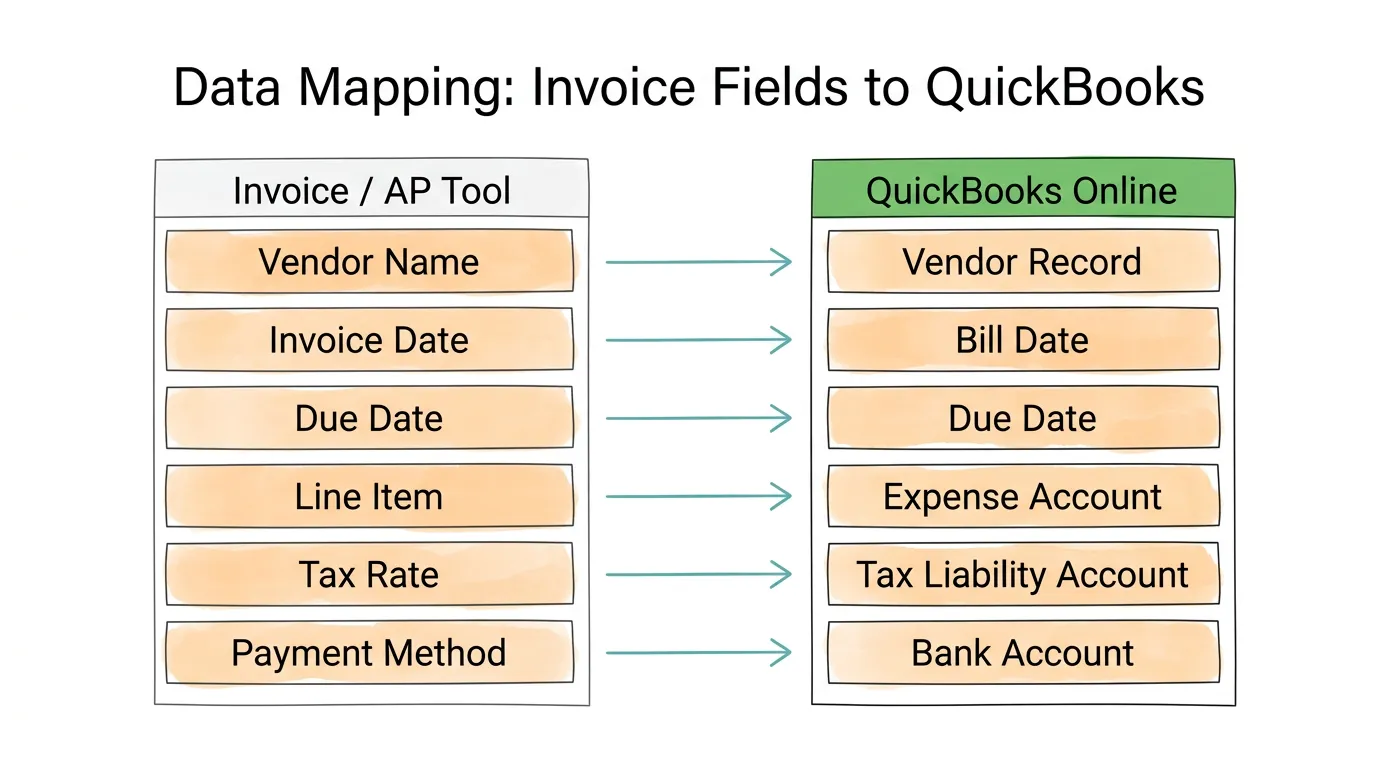
The core invoice fields that post to each QuickBooks bill or accounts payable transaction:
| Field in Invoice | QuickBooks Field | Notes |
|---|---|---|
| Vendor name | Vendor | Must match QuickBooks vendor record |
| Invoice number | Ref no. | Used for duplicate detection |
| Invoice date | Bill date | The date of the vendor's invoice |
| Due date | Due date | Calculated from terms or explicit on invoice |
| Total amount | Total | Should match sum of line items + tax |
| Currency | Currency | Requires multi-currency enabled in QBO |
| PO reference | Custom field or memo | Depends on QBO plan |
Line-item sync is what separates a useful integration from a basic one. Posting only the invoice total to a single expense account tells you how much you spent; posting line items tells you what you spent it on.
Each line item syncs:
The class tracking requirement: QuickBooks Online Plus and Advanced plans support class tracking, which allows expense allocation by department, project, or location at the line-item level. If your AP tool does not support class-level data mapping, you lose this granularity in QuickBooks even if QBO supports it.
Tax mapping is the highest-stakes data mapping decision in any QuickBooks Online integration. Incorrect tax mapping creates reporting errors that surface during tax filing or audit preparation.
What must be configured correctly:
For US businesses using QuickBooks Online's automated sales tax feature, the integration must be configured to pass tax jurisdiction information rather than just a tax amount, so QBO can apply the correct rate automatically. Hard-coding a tax amount bypasses QuickBooks' tax compliance features.
When a vendor invoice is paid, the payment record should also sync to QuickBooks, marking the bill as paid and updating your accounts payable aging report. Without payment sync, bills that have been paid through your AP tool remain shown as outstanding in QuickBooks, making your AP aging report unreliable.
Payment sync includes:
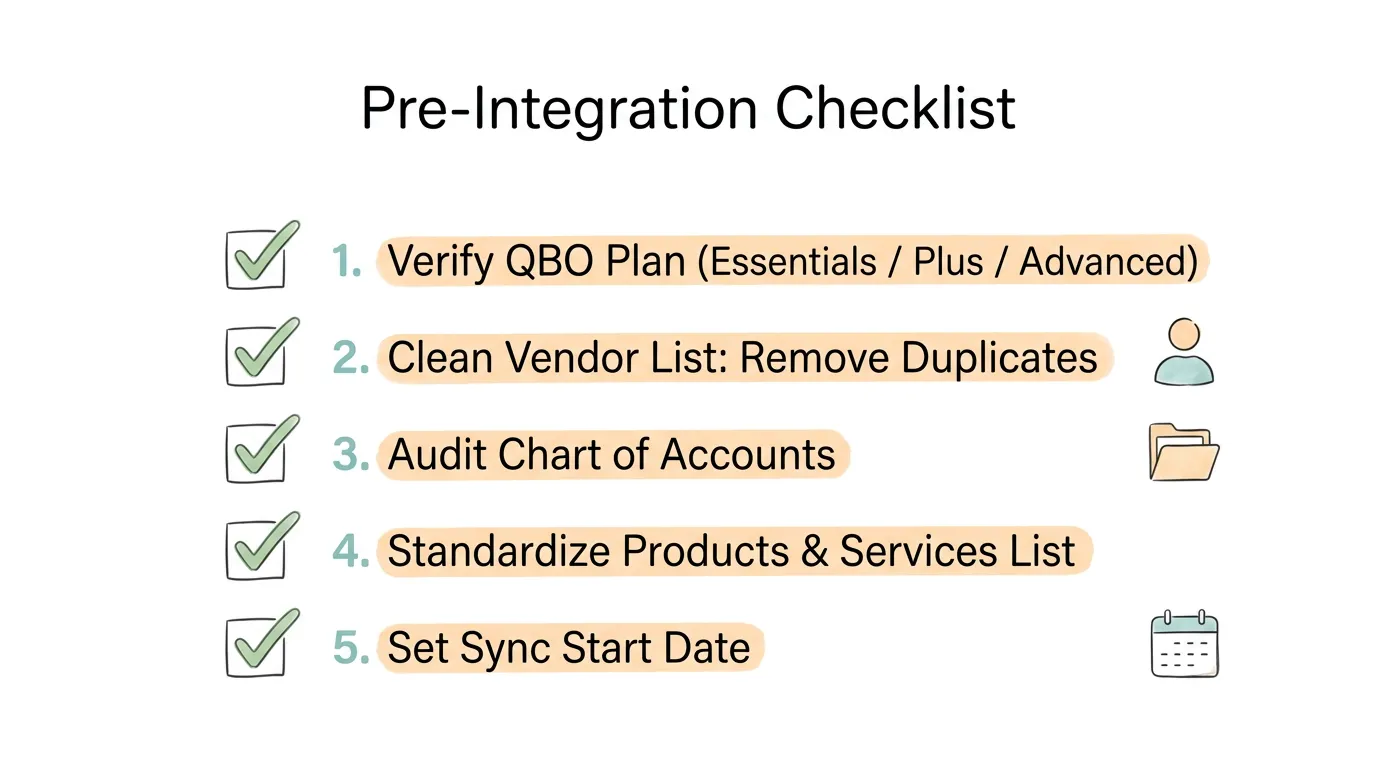
The most common integration problems are not technical failures — they are data quality problems that the connection exposes. A one-hour data preparation session before go-live prevents weeks of post-integration cleanup.
QuickBooks Online Simple Start has limited third-party integration capabilities. Essentials, Plus, and Advanced plans support the full QuickBooks Online API and third-party app connections. Check your current plan on your QuickBooks subscription settings page before investing in integration configuration.
Advanced features — class tracking, project tracking, custom fields on bills, and batch invoicing — are available only on Plus and Advanced plans. If your integration requires these features, confirm your plan before setup.
Run a vendor list export from QuickBooks and identify:
Merge duplicate vendor records in QuickBooks before connecting. After integration, the sync engine will create new records for any unmatched vendor names, making deduplication harder.
Your chart of accounts is where every invoice line item lands. Before integration:
For AP automation specifically, confirm you have accounts for: accounts payable (usually auto-created by QBO), individual expense categories (Office Supplies, Software, Professional Services, etc.), and a clearing account if you use an intermediate payment workflow.
In QuickBooks Online, every invoice line item must map to a Product or Service record. Before integration, review your QBO items list:
Determine the date from which you want to sync historical data. For most businesses new to integration, the recommended approach is:
Attempting to sync years of historical data as the first sync creates a large volume of potential conflicts with existing manually-entered QuickBooks records. Start narrow, verify, then expand.
In your invoice/AP tool (TallyScan), navigate to Settings → Integrations → QuickBooks Online and click Connect. You will be redirected to Intuit's secure authorization page.
Critical: you are authorizing on Intuit's platform, not your AP tool. Your QuickBooks username and password are never shared with or stored by the connecting application. OAuth 2.0 generates a secure access token that grants specific, limited permissions to the AP tool — and you can revoke this access from QuickBooks at any time without changing your password.
The permissions requested will include:
Review the permissions list, click Connect, and you will be returned to your AP tool with the integration status showing as active.
After connecting, you will configure the default mappings for each of the five data categories:
Vendor mapping: Choose whether unmatched vendors are auto-created in QuickBooks or routed to an exception queue. Auto-creation is faster but can create duplicate vendors if names are inconsistent. Exception queue requires manual action but keeps your vendor list clean. We recommend exception queue during the pilot period, switching to auto-create after your vendor names are standardized.
Expense account mapping: Set the default QuickBooks expense account for each vendor category or product type. Most integrations allow you to configure: a global default account (used when no specific mapping applies), vendor-specific defaults (all invoices from this vendor go to this account), and item-specific overrides (this line item type always goes to this account regardless of vendor).
Tax mapping: Map each tax rate in your AP tool to the corresponding tax rate in QuickBooks. For US businesses, this typically means mapping standard rates (e.g., 8.25% state + county) to your QuickBooks tax agency records. For international businesses with VAT, map input VAT rates to the corresponding VAT recovery accounts.
Payment method mapping: Map each payment method in your AP tool (ACH, check, wire, credit card) to the corresponding QuickBooks bank account or credit card account.
Class tracking mapping (Plus and Advanced plans only): If you use class tracking for department or project allocation, map your AP tool's department/project codes to the corresponding QuickBooks classes.
Sync frequency: Real-time API integrations sync at the moment an invoice is approved or a payment is processed. If your AP tool offers batch sync options, real-time is almost always preferable for AP workflows.
Duplicate prevention: Enable duplicate bill detection — the integration should check for an existing bill with the same vendor and invoice number before creating a new entry. Without this, re-syncing a previously synced invoice creates a duplicate posting.
Error handling: Configure where sync errors are surfaced. A dedicated sync error dashboard (not a generic notification email) that shows the specific invoice and the specific field that caused the failure is essential for efficient exception management.
Before going live, test with 5 to 10 real invoices from your most common vendors. Verify:
Reconcile the test invoices manually against QuickBooks entries. Only after this verification should you enable full-volume sync.
QuickBooks Online supports multi-currency billing when the multi-currency feature is enabled (note: once enabled, it cannot be disabled). For businesses with international suppliers invoicing in foreign currencies:
Ensure your AP tool passes the currency code alongside amounts. If it passes amounts only (no currency code), every bill posts in your home currency, eliminating multi-currency tracking.
QuickBooks Online Plus and Advanced support class tracking (department, product line) and location tracking (office, territory). When your AP tool supports these dimensions:
This is particularly valuable for professional services firms, nonprofits, and multi-department businesses where cost allocation is critical for financial reporting.
For US businesses, QuickBooks Online tracks 1099-eligible payments to independent contractors. For this to work correctly in an integrated system:
Verify your integration handles 1099 tracking correctly during setup, not at year-end when the issue surfaces. For tax record retention requirements, the IRS recommends keeping business records for a minimum of 3 years for most items and up to 7 years for property-related records.
AI-powered AP tools can suggest GL account codes for each invoice line item based on the vendor, the item description, and your historical coding patterns. When integrated with QuickBooks, these AI-suggested codes can be reviewed in the AP tool's exception interface and confirmed before syncing — maintaining human oversight while eliminating manual coding for routine invoices.
Over time, the AI learns your coding patterns for each vendor and item type, reaching auto-code accuracy rates above 95% for established vendors. This is particularly valuable for high-volume, diverse spend categories where manual GL coding is a significant time cost.
For more on AI-powered invoice processing, see our guides on accounting AI and invoice data capture software.
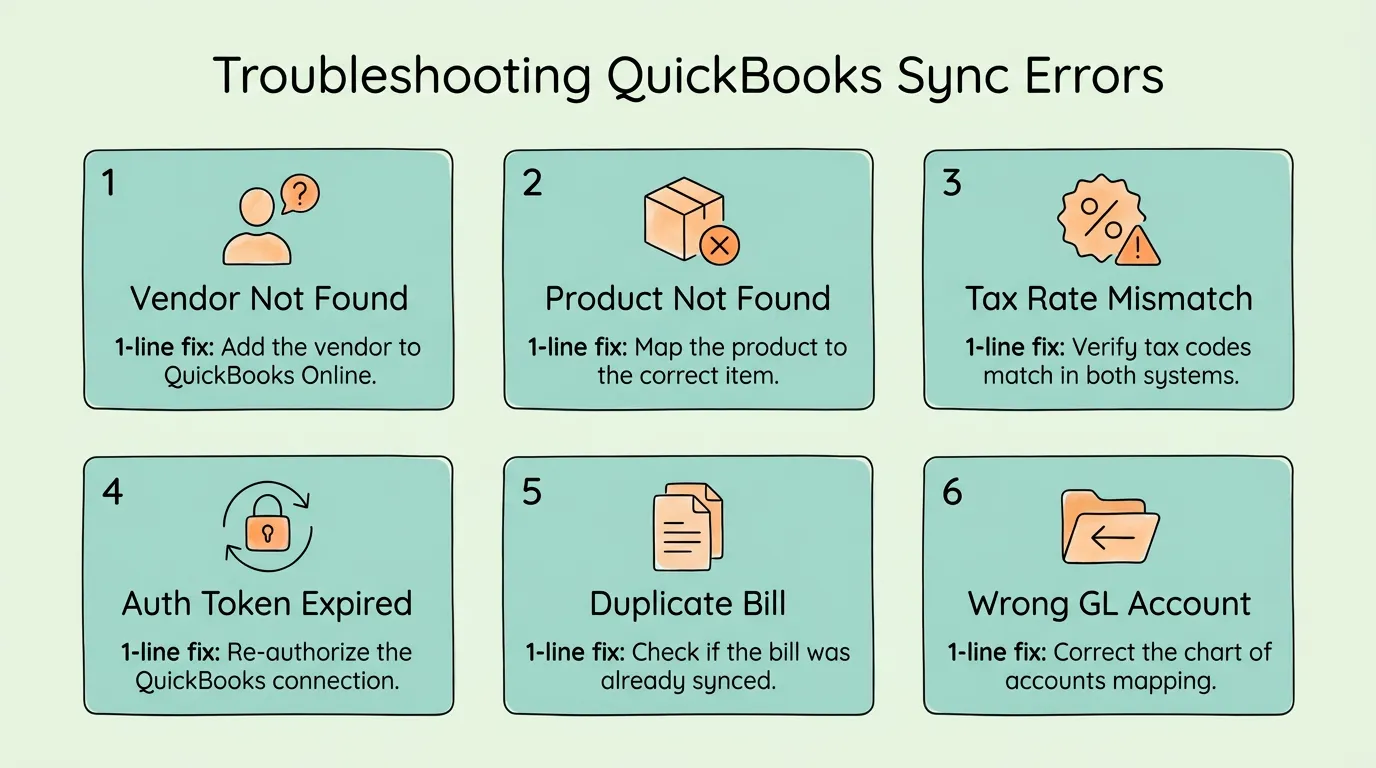
Cause: The vendor name in your AP tool does not exactly match the vendor name in QuickBooks (case, punctuation, abbreviation, or legal name variation).
Fix: Standardize the vendor name in your AP tool to match QuickBooks exactly, or update the QuickBooks vendor record to match your AP tool. Going forward, create new vendors in QuickBooks first, then add them to your AP tool vendor master using the identical name.
Cause: An invoice line item references a product or service code that does not exist in your QuickBooks items list.
Fix: Add the missing product or service to QuickBooks Sales → Products and Services, then retry the sync. Long-term fix: configure your AP tool to route invoices with unrecognized item codes to an exception queue before attempting to sync, rather than failing mid-sync.
Cause: A tax rate on the invoice does not have a corresponding match in QuickBooks' tax settings, or the tax mapping configuration is incorrect.
Fix: In QuickBooks, verify the tax rate exists under Taxes → Sales Tax. In your integration settings, re-map the AP tool tax rate to the correct QuickBooks tax rate. For US businesses: if you are using QuickBooks' automated sales tax, ensure the integration is passing jurisdiction information, not a fixed tax amount.
Cause: The OAuth access token has expired (typically after 100 days of inactivity) or your QuickBooks password was recently changed.
Fix: Disconnect the integration from your AP tool settings and reconnect using the OAuth flow. This generates a fresh access token without requiring any changes to QuickBooks. Your existing data is not affected — disconnecting pauses the sync but does not delete previously synced records.
Cause: The same invoice was synced twice — either by re-triggering a sync manually, or because the integration's duplicate detection was not enabled or failed to match on vendor + invoice number.
Fix: In QuickBooks, identify and void the duplicate bills. Enable duplicate detection in your integration settings. Verify the integration is checking for an existing bill with the same vendor reference number before creating a new one.
Cause: Default account mapping was not configured, and the integration used a catch-all account. Or, an exception invoice bypassed normal routing and was manually approved without account verification.
Fix: Review and correct the account mapping in your integration settings. For the incorrectly posted bills, use a QuickBooks journal entry to reclassify them to the correct accounts. Enable a required-field policy in your AP tool that prevents sync for any invoice where the GL account has not been confirmed.
For proactive audit preparation that catches integration errors before they compound, see our audit readiness checklist.
Financial data is among the most sensitive data your business holds. Understanding how an integration protects it is not optional — it is a due diligence requirement before connecting any system to your accounting platform.
OAuth 2.0 authorization: All QuickBooks Online integrations authorized through Intuit use OAuth 2.0. This means your QuickBooks username and password are entered on Intuit's servers only, and are never transmitted to or stored by the connecting application. The AP tool receives a time-limited access token that grants specific permissions you authorized. You can revoke this token from QuickBooks at any time without changing your login credentials.
Permission scoping: The access token grants only the specific permissions you authorized during setup — typically read access to vendor lists and chart of accounts, and write access to bills and payments. The AP tool cannot access QuickBooks features or data outside the authorized scope.
Data encryption: Data transmitted between your AP tool and QuickBooks Online is encrypted in transit using TLS 1.2 or higher. Reputable AP tools also encrypt data at rest using AES-256. Verify both with your AP vendor before connecting.
SOC 2 Type II certification: For AP tools that store your invoice data (not just pass it through), SOC 2 Type II certification confirms that the vendor's security controls have been independently audited over an extended period. Request the SOC 2 report before connecting any AP tool to QuickBooks — a vendor unwilling to provide it should not be trusted with financial data. More on this standard from the AICPA.
Access control: Your AP tool should support role-based access controls (AP processors, approvers, and administrators with different permission levels) and single sign-on (SSO) integration with your identity provider. Ensure that access to the QuickBooks integration settings is restricted to administrators only — non-administrative staff should not be able to disconnect, modify mapping, or trigger manual syncs.
QuickBooks Online Essentials, Plus, and Advanced all support full third-party integrations via the QuickBooks Online API. Simple Start has significant limitations and may not support all integration features. Plus is the minimum plan for class tracking and project tracking, which are required for department-level expense allocation. Advanced adds custom fields on bills, batch invoicing, and dedicated account manager support. Most AP automation integrations work fully on Essentials or Plus plans. Confirm your specific integration's QBO plan requirements before purchasing or upgrading.
A properly configured integration with duplicate detection enabled will not create duplicate bills. The integration checks for an existing bill with the same vendor reference number before creating a new entry. If the same invoice is submitted again (for example, by a vendor resubmitting an unpaid invoice), the system flags it as a potential duplicate for review rather than creating a second bill. Duplicate detection must be explicitly enabled in your integration settings — it is not always on by default. Verify this setting during setup and test it by attempting to sync the same invoice twice before going live.
Yes, but with caution. Syncing a historical period where you have already manually entered bills in QuickBooks can create duplicates if the sync does not successfully match the existing records. Best practice: set a sync start date that begins after your last manually entered bill, rather than overlapping with existing data. If you need to sync historical invoices for a period that already has manual entries, work with your AP tool's support team to configure record matching that identifies and skips existing entries.
When QuickBooks Online's multi-currency feature is enabled, the integration syncs the invoice currency code and amount. QuickBooks records the transaction in the foreign currency and calculates the home currency equivalent using the exchange rate at the transaction date. Foreign currency bills appear on your aging report in both the foreign currency and the home currency equivalent. Note: the multi-currency feature in QuickBooks Online cannot be disabled once enabled — confirm this is the right configuration for your business before activating it.
Disconnecting the integration immediately stops the two-way sync — new invoices processed in your AP tool will no longer post to QuickBooks automatically. However, all previously synced bills, payments, and vendor records remain in QuickBooks unchanged. Disconnecting does not delete data from either system. When you reconnect, you set a new sync start date and configure settings again — the integration picks up from the reconnection point. Bills created during the disconnected period must be entered manually or synced manually if your AP tool supports backfill sync.
After your initial test sync, verify: (1) Check 5 to 10 synced bills in QuickBooks and confirm vendor, amount, due date, line items, and GL accounts are all correct; (2) Run an accounts payable aging report in QuickBooks and verify the outstanding bills match what you expect; (3) Process a test payment in your AP tool and confirm it marks the corresponding QuickBooks bill as paid; (4) Check that no duplicate vendor records or duplicate bills were created; (5) Verify tax amounts post to the correct tax liability accounts. Monthly, reconcile your AP tool's outstanding invoice list against QuickBooks' AP aging report to catch any sync discrepancies before they compound. For a complete reconciliation framework, see our guide on how to reconcile invoices.
Yes, when your AP tool supports AI-powered GL coding. AI systems learn your coding patterns from historical invoice data — after processing enough invoices from each vendor, the system can suggest or auto-apply the correct GL account for each line item. You review and confirm auto-coded invoices before they sync to QuickBooks, maintaining control while eliminating manual coding for routine invoices. Accuracy rates above 95% are achievable for established vendor relationships after sufficient training data. For a new integration, expect manual coding review for the first 30 to 60 days while the AI model learns your specific coding patterns. For the broader AI in accounting context, see our guide on accounting AI.
A real-time QuickBooks Online integration means your accounts payable aging is always current — QuickBooks knows your outstanding liabilities within minutes of an invoice being approved, not at the end of a manual data entry session. This current liability view directly improves cash flow forecasting: your finance team can see exactly what is due in the next 7, 14, and 30 days without running a reconciliation first. Combined with early payment discount tracking (which requires knowing the exact due date and discount deadline for each invoice), the integration enables systematic capture of early payment discounts — Ardent Partners reports that best-in-class teams capture 92% of available discounts versus the industry average of 41%. For the complete cash flow optimization framework, see our guide on how to improve cash flow and our accounts payable tracking guide.
A QuickBooks Online integration that works correctly is invisible. Invoices appear in QuickBooks after they are approved. Payments mark bills as paid. The GL reflects your actual liabilities in real time. Your finance team does not think about the integration because there is nothing to think about — it just works.
Getting to that state requires the pre-integration data preparation this guide covers, correct field-level mapping for all five data categories, and a verified test sync before going live. Teams that skip these steps spend weeks cleaning up duplicate vendors, reclassifying incorrectly coded bills, and reconciling sync errors. Teams that do the preparation upfront experience the invisible integration that makes every subsequent accounting task easier.
TallyScan integrates directly with QuickBooks Online via real-time API sync — invoices captured from email or portals, extracted with 98%+ field accuracy, approved through your configured workflow, and posted to QuickBooks automatically. For a broader look at what this integration enables across your financial workflow, see our guide on syncing invoices to QuickBooks, Xero, and Google Drive and our overview of streamlining invoice processing.
Connect TallyScan to QuickBooks Online today and have your first invoices syncing automatically within the hour.
10 automated invoice capture tools compared honestly. Includes real cost data, ROI calculator, format support matrix, and an 8-point evaluation checklist.
Manual AP costs $10-$15 per invoice. This guide maps where your process breaks down, the seven fixes with the best ROI, and the KPIs to track real improvement.